Sunday, January 2, 2011

Use LinsUI Layout Manager with new project

1.   How to create a new MDI container.
a.    Launch Visual Studio.
b.    File->New->Project…, it will show the following dialog. Select “Windows Forms Application” as template and enter “MyProject” as project name.
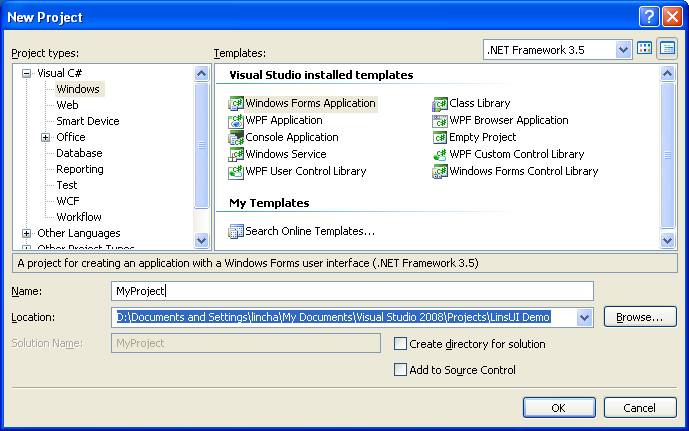
c.    Click “OK” button. You should see the following shown on your screen.
d.   Change Text to MyMDIForm, WindowState to Maximized, and IsMdiContainer to True.
e.    Rename the class name from Form1 to MyMDIForm.
f.     Project-> Add Reference…and it will show the following dialog. Select “Browse” tab. Choose both LinsUI.dll and UtilLib.dll under file://linssoft/LinsUI/bin/Debug. Click “OK” button.
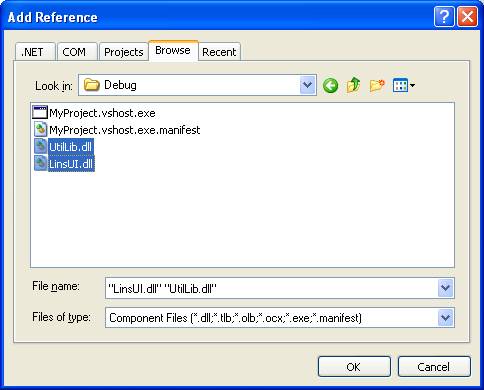
g.    Open MyMDIForm.cs file, add the following line
using LinsUI;
and change its base class from Form to LinsUI.FlexMDIForm, like the following,
public partial class MyMDIForm : LinsUI.FlexMDIForm
{
public MyMDIForm()
{
InitializeComponent();
}
} 
 h.    Open Program.cs file, set the default path for the layout settings file, the default path for the help file, and the default path for the icons.
[STAThread]
static void Main()
{
// Get the entry assembly
Assembly assem = Assembly.GetEntryAssembly();
// Get the application location
string csAssemName = assem.Location;
// Get the applicationb name
string csProjectName = assem.GetName().Name;
// Get the path where the application is located
string csDirectory = Path.GetDirectoryName(csAssemName);
int nIndex = csDirectory.LastIndexOf("Samples");
string csSampleDirectory = csDirectory.Substring(0, nIndex) + "Samples\\";

// Set the default path for saving the layout settings file,
FlexUISettings.AppSettingPath = Path.Combine(csDirectory, csProjectName);

// Set the default path for get the Help file
FlexUISettings.DefaultHelpFilePath = Path.Combine(csSampleDirectory, "Helps"); ;

// Set the default path for icons
FlexManager.DefaultIconsPath = Path.Combine(csSampleDirectory, "Icons");

Application.EnableVisualStyles();
Application.SetCompatibleTextRenderingDefault(false);
Application.Run(new MDIForm());
}

2.   How to create a new child form.
a.    Project->Add Windows Form…, it should bring up the following dialog.
Choose “Windows Forms” as Category and “Inherited Form” as Template. Use “MyChildForm” as the class name. Click “Add” button.
b.   It should show the “Inheritance Picker” dialog. Click “Browse…” button.
c.    It will show the following dialog. Go to file://linssoft/LinsUI/bin/Debug, and select LinsUI.dll. Click “Open” button.
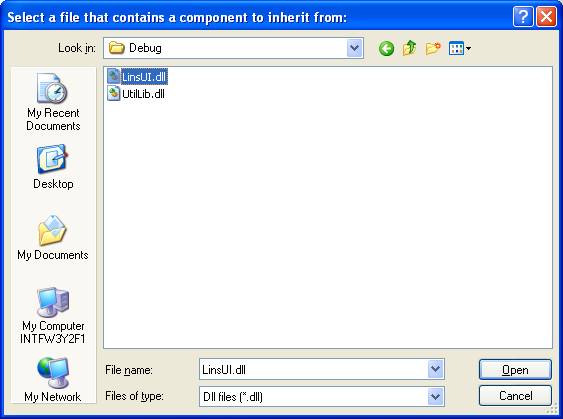
d.   It will show the following dialog. Select “FlexForm”. Click “OK” button.
e.    In the “Properties” panel, set FlexDock to RIGHT.
f.     Open MyChildForm.cs file, add the following line
using LinsUI;
And assign a unique ID to it, like following
public partial class MyChidlForm : LinsUI.FlexForm
{
public MyChidlForm()
{
InitializeComponent();
this.ID = FlexConstants.m_nUserDefinedControlStartID + 1;
}
}
g.     You can create the form as following,
public MDIForm ()
{
SuspendLayout();
InitializeComponent();

// Create a child form.
MyChildForm myChildForm = new MyChildForm();
// Show the form.
myChildForm.ShowForm();

ResumeLayout( false );
PerformLayout();
}

3.   How to create a panel.
a.    Project->Add User Control…, it should bring up the following dialog.
Choose “Windows Forms” as Category and “Inherited User Control” as Template. Use “MyPanel” as the class name. Click “Add” button.
b.   It should show the “Inheritance Picker” dialog. Click “Browse…” button.
c.    It will show the following dialog. Go to file://linssoft/LinsUI/bin/Debug, and select LinsUI.dll. Click “Open” button.
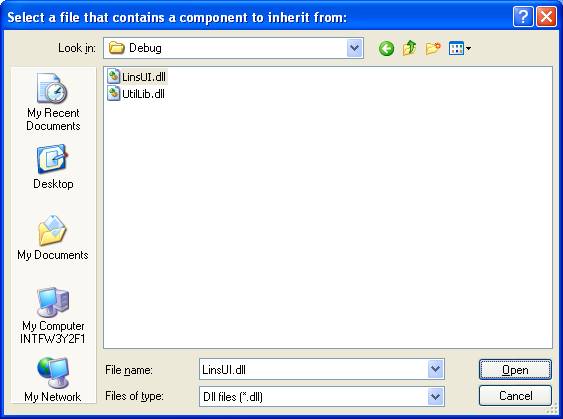
d.   It will show the following dialog. Select “FlexPanel”. Click “OK” button.
e.    In the “Properties” panel, set Text to “Demo Panel” and FlexDock to RIGHT.
f.     Open MyPanel.cs file, add the following line
using LinsUI;
And assign a unique ID to it, like following
public partial class MyPanel : LinsUI.FlexPanel
{
public MyPanel()
{
InitializeComponent();
this.ID = FlexConstants.m_nUserDefinedControlStartID + 2;
}
}
g.    You can create the panel as following,
public MDIForm ()
{
SuspendLayout();
InitializeComponent();

// Create a child form.
MyChildForm myChildForm = new MyChildForm();
// Show the form.
myChildForm.ShowForm();

// Create a panel.
MyPanel myPanel = new MyPanel();
// Show the form.
myPanel.ShowPanel();

ResumeLayout( false );
PerformLayout();
}

4.   How to create a toolbar.
a.    Project->Add User Control…, it should bring up the following dialog.
Choose “Windows Forms” as Category and “Inherited User Control” as Template. Use “MyToolbar” as the class name. Click “Add” button.
b.   It should show the “Inheritance Picker” dialog. Click “Browse…” button.
c.    It will show the following dialog. Go to file://linssoft/LinsUI/bin/Debug, and select LinsUI.dll. Click “Open” button.
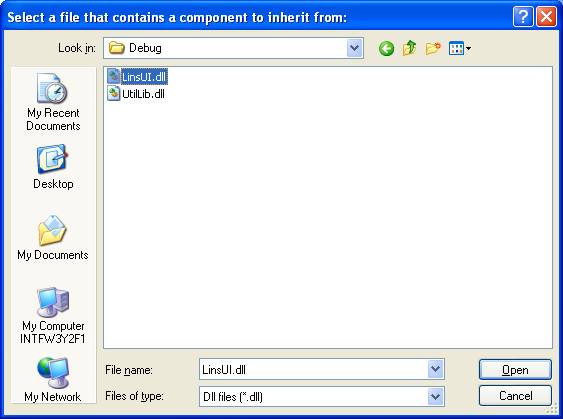
d.   It will show the following dialog. Select “FlexToolStrip”. Click “OK” button.
e.    Drag an ImageList from “ToolBox” into the toolstrip, and select some images/icons into the ImageList object.
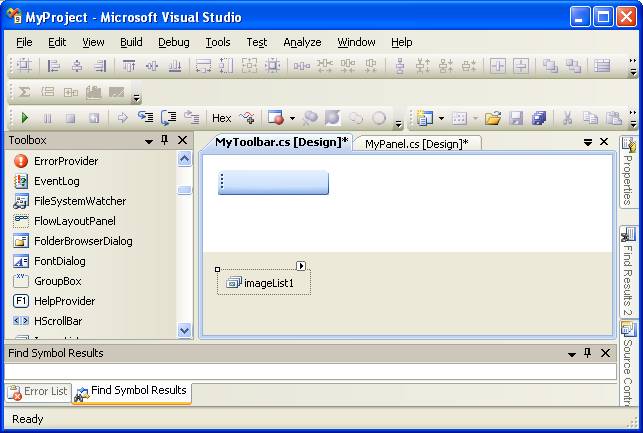
f.     In the “Properties” panel, set Text to “Demo Toolbar”, ImageList to “imageList1.
g.    Add a button and a combo box into the toolbar as the following,
h.    Open MyToolbar.cs file, add the following line
using LinsUI;
And assign a unique ID to it, like following
public partial class MyToolbar : LinsUI.FlexToolStrip
{
public MyToolbar()
{
InitializeComponent();
this.ID = FlexConstants.m_nUserDefinedControlStartID + 3;
}
}
i.      Open MyToolbar.Designer.cs file, add the following line
using LinsUI;
Replace the following code,
// The old code
this.toolStripButton1.Image = ((System.Drawing.Image)(resources.GetObject("toolStripButton1.Image")));
// The new code
this.toolStripButton1.ImageIndex = 0;
Also add the following line
this.toolStripComboBox1.ImageIndex = 1;
j.     You can create the toolbar as following,
public MDIForm ()
{
SuspendLayout();
InitializeComponent();

// Create a child form.
MyChildForm myChildForm = new MyChildForm();
// Show the form.
myChildForm.ShowForm();

// Create a panel.
MyPanel myPanel = new MyPanel();
// Show the panel.
myPanel.ShowPanel();

// Create a toolbar.
MyToolbar myToolbar = new MyToolbar();
// Show the toolbar.
myToolbar.ShowToolStrip();

// If you want to add the toolbar into a panel, you can do it this way
// myPanel.InsertToolStrip( myToolbar, 0, 0 );

ResumeLayout( false );
PerformLayout();
}

5.   How to create a menubar.
a.    Project->Add User Control…, it should bring up the following dialog.
Choose “Windows Forms” as Category and “Inherited User Control” as Template. Use “MyMenubar” as the class name. Click “Add” button.
b.   It should show the “Inheritance Picker” dialog. Click “Browse…” button.
c.    It will show the following dialog. Go to file://linssoft/LinsUI/bin/Debug, and select LinsUI.dll. Click “Open” button.
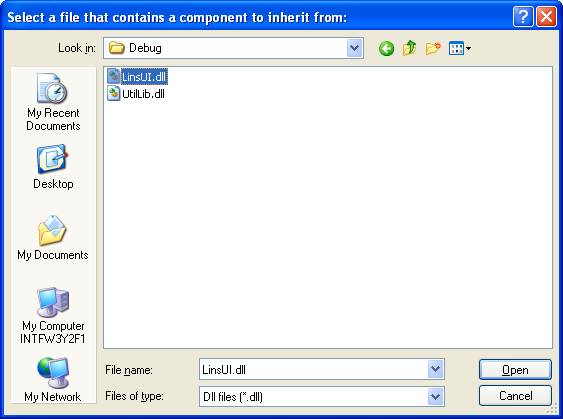
d.   It will show the following dialog. Select “LinsMenuStrip”. Click “OK” button.
e.    Add some menu items into the menubar as the following,
f.     Open MyMenubar.cs file, add the following line
using LinsUI;
And assign a unique ID to it, like following
public partial class MyMenubar : LinsUI.LinsMenuStrip
{
public MyMenubar ()
{
InitializeComponent();
this.ID = FlexConstants.m_nUserDefinedControlStartID + 4;
}
}
g.    You can create the toolbar as following,
public MDIForm ()
{
SuspendLayout();
InitializeComponent();

// Create a child form.
MyChildForm myChildForm = new MyChildForm();
// Show the form.
myChildForm.ShowForm();

// Create a panel.
MyPanel myPanel = new MyPanel();
// Show the panel.
myPanel.ShowPanel();

// Create a toolbar.
MyToolbar c = new MyToolbar();
// Show the toolbar.
MyToolbar.ShowToolStrip();

// If you want to add the toolbar into a panel, you can do it this way
// myPanel.InsertToolStrip( myToolbar, 0, 0 );

// Create a menubar.
MyMenubar myMenubar = new MyMenubar();
// Show the menubar.
myMenubar.ShowMenuStrip();
// Set myMenubar as the main menu of the main frame.
SetMenuStrip( myMenubar );

// If you want to set the myMenubar as panel’s menubar, you can do it this way
// myPanel.SetMenuStrip( myMenubar );

ResumeLayout( false );
PerformLayout();

How to embed LinsUI Layout Manager into an existing project

1.    Locate the Form which is a container for multiple-document interface (MDI) child forms. Change its base class from Form to LinsUI.FlexMDIForm. For example, if MyMDIForm class is your MDI container,
// The old code
public partial class MyMDIForm : Form
{
}

// The new code
using LinsUI;
public partial class MyMDIForm : LinsUI.FlexMDIForm
{
}
  
2.    Open Program.cs file, set the default path for the layout settings file, the default path for the help file, and the default path for the icons.
[STAThread]
static void Main()
{
// Get the entry assembly
Assembly assem = Assembly.GetEntryAssembly();
// Get the application location
string csAssemName = assem.Location;
// Get the applicationb name
string csProjectName = assem.GetName().Name;
// Get the path where the application is located
string csDirectory = Path.GetDirectoryName(csAssemName);
int nIndex = csDirectory.LastIndexOf("Samples");
string csSampleDirectory = csDirectory.Substring(0, nIndex) + "Samples\\";

// Set the default path for saving the layout settings file,
FlexUISettings.AppSettingPath = Path.Combine(csDirectory, csProjectName);

// Set the default path for get the Help file
FlexUISettings.DefaultHelpFilePath = Path.Combine(csSampleDirectory, "Helps"); ;

// Set the default path for icons
FlexManager.DefaultIconsPath = Path.Combine(csSampleDirectory, "Icons");

Application.EnableVisualStyles();
Application.SetCompatibleTextRenderingDefault(false);
Application.Run(new MDIForm());
}

3.    Change the base class of all child forms from Form to LinsUI.FlexForm, and assign every form a unique ID which should be between FlexConstants.m_nUserDefinedControlStartID and FlexConstants.m_nUserDefinedControlEndID. For example,
// The old code
public partial class MyChildForm : Form
{
public MyChildForm()
{
InitializeComponent();
}
}

// The new code
using LinsUI;
public partial class MyChildForm : LinsUI.FlexForm
{
public MyChildForm ()
{
InitializeComponent();

// Assign a unique ID which should be between FlexConstants.m_nUserDefinedControlStartID and
// FlexConstants.m_nUserDefinedControlEndID
this.ID = FlexConstants.m_nUserDefinedControlStartID + 1;         
}
}

Inside InitializeComponent(), assign the dock style.
using LinsUI;
private void InitializeComponent()
{
//
// your existing code
//

// Assign the dock style.
this.FlexDock = LinsUI.FLEX_DOCKING_ALIGN.LEFT;
}

You can create the derived form any where as following,
public partial class MyMDIForm : LinsUI.FlexMDIForm
{
public MyMDIForm ()
{
SuspendLayout();
InitializeComponent();

// Create a child form.
MyChildForm myChildForm =  new MyChildForm();
// Show the form.
myChildForm.ShowForm();

ResumeLayout( false );
PerformLayout();
}
}

Note: You do not need to assign a parent to the derived form. So remove all the code like this.Controls.Add( myChildForm ).

4.    Change the base class of all panels from Panel to LinsUI.FlexPanel, and assign the panel a unique ID which should be between FlexConstants.m_nUserDefinedControlStartID and FlexConstants.m_nUserDefinedControlEndID. For example,
// The old code
public partial class MyPanel : Panel
{
public MyPanel()
{
InitializeComponent();
}
}

// The new code
using LinsUI;
public partial class MyPanel : LinsUI.FlexPanel
{
public MyPanel ()
{
InitializeComponent();
// Assign a unique ID which should be between FlexConstants.m_nUserDefinedControlStartID and
// FlexConstants.m_nUserDefinedControlEndID
this.ID = FlexConstants.m_nUserDefinedControlStartID + 2;         
}
}

Inside InitializeComponent(), assign the dock style.
using LinsUI;
private void InitializeComponent()
{
//
// your existing code
//

//Assign the dock style.
this.FlexDock = LinsUI.FLEX_DOCKING_ALIGN.RIGHT;
}

You can create the derived panel any where as following,
public partial class MyMDIForm : LinsUI.FlexMDIForm
{
public MyMDIForm ()
{
SuspendLayout();
InitializeComponent();

// Create a panel.
MyPanel myPanel =  new MyPanel();
// Show the panel.
myPanel.ShowPanel();

ResumeLayout( false );
PerformLayout();
}
}

Note: You do not need to assign a parent to the derived panel. So remove all the code like this.Controls.Add( myPanel ).

5.    Change the base class of all toolbars from ToolStrip to LinsUI.FlexToolStrip, and assign the toolbar a unique ID which should be between FlexConstants.m_nUserDefinedControlStartID and FlexConstants.m_nUserDefinedControlEndID. For example,
// The old code
public partial class MyToolStrip : ToolStrip
{
public MyToolStrip()
{
InitializeComponent();
}
}

// The new code
using LinsUI;
public partial class MyToolStrip : LinsUI.FlexToolStrip
{
public MyToolStrip ()
{
InitializeComponent();
// Assign a unique ID which should be between FlexConstants.m_nUserDefinedControlStartID and
// FlexConstants.m_nUserDefinedControlEndID
this.ID = FlexConstants.m_nUserDefinedControlStartID + 3;         
}
}

Inside InitializeComponent(), assign the dock style.
using LinsUI;
private void InitializeComponent()
{
//
// your existing code
//

// Assign the dock style.
this.FlexDock = LinsUI.FLEX_DOCKING_ALIGN.RIGHT;
}

You can create the derived toolbar any where as following,
public partial class MyMDIForm : LinsUI.FlexMDIForm
{
public MyMDIForm ()
{
SuspendLayout();
InitializeComponent();

// Create a toolbar.
MyToolStrip myToolbar =  new MyToolStrip();
// Show the toolbar.
myToolbar. ShowToolStrip();

ResumeLayout( false );
PerformLayout();
}
}

Note: You do not need to assign a parent to the derived toolbar. So remove all the code like this.Controls.Add( myToolbar ).

6.    Change the base class of all menu bars from MenuStrip to LinsUI.LinsMenuStrip, and assign the menu bar a unique ID which should be between FlexConstants.m_nUserDefinedControlStartID and FlexConstants.m_nUserDefinedControlEndID. For example,
// The old code
public partial class MyMenuStrip : MenuStrip
{
public MyMenuStrip()
{
InitializeComponent();
}
}

// The new code
using LinsUI;
public partial class MyMenuStrip : LinsUI.LinsMenuStrip
{
public MyMenuStrip()
{
InitializeComponent();
//Assign a unique ID which should be between FlexConstants.m_nUserDefinedControlStartID and
//FlexConstants.m_nUserDefinedControlEndID
this.ID = FlexConstants.m_nUserDefinedControlStartID + 3;         
}
}

Example 1:
You can assign the derived menu bar as the main menu as following,
public partial class MyMDIForm : LinsUI.FlexMDIForm
{
public MyMDIForm ()
{
SuspendLayout();
InitializeComponent();

// Create a menu bar.
MyMenuStrip myMenubar =  new MyMenuStrip();
// Show the menu bar.
myMenubar. ShowMenuStrip();
// Set myMenubar as the main menu.
SetMenuStrip( myMenubar );

ResumeLayout( false );
PerformLayout();
}
}

Example 2:
Or you can assign the derived menu bar as a panel’s menu bar,
public partial class MyPanel : LinsUI.FlexPanel
{
public MyPanel()
{
SuspendLayout();
InitializeComponent();
// Assign a unique ID which should be between FlexConstants.m_nUserDefinedControlStartID and
// FlexConstants.m_nUserDefinedControlEndID
this.ID = FlexConstants.m_nUserDefinedControlStartID + 1;         

// Create a menu bar.
MyMenuStrip myMenubar =  new MyMenuStrip();
// Show the menu bar.
myMenubar. ShowMenuStrip();
// Set myMenubar as the menu bar of this panel.
SetMenuStrip( myMenubar );

ResumeLayout( false );
PerformLayout();
}
}

Note: You do not need to assign a parent to the derived menu bar. So remove all the code like this.Controls.Add( myMenubar ).
After you do all of above, you are ready to use the LinsUI Layout Manager.

Download Free Trial,

Setup LinsUI Layout Manager

1.   Unzip LinsSoft.zip file, save the extracted files into a new folder, and name the folder as LinsSoft.
2.   Add both LinsUI.dll and UtilLib.dll to project reference list.
  1. Project->Add Reference…, it will open the “Add Reference” dialog.
  2. Select “Browse” tab, and go to file://linssoft/LinsUI/bin/Debug or file://linssoft/LinsUI/bin/Release folder.
  3. Select both LinsUI.dll and UtilLib.dll, and click “OK” button.

Features of LinsUI Layout Manager 2.1

1.    User Interface Layout Setting persistence
The User Interface (UI) layout will be automatically persistent. The user can also export the current UI layout to a XML setting file, or import a previous layout setting as the current UI layout.
2.    Multiple Docking Choices
When a user drags a FlexForm / FlexPanel object over a docking sign, the user can use the Tab key to select different kind of available docking choices.
3.    Customizable tool bars and menu bars
LinsMenuStrip and FlexToolStrip objects can be turned on/off. They can be embedded into a panel. All tool items are customizable.
4.    System Functions
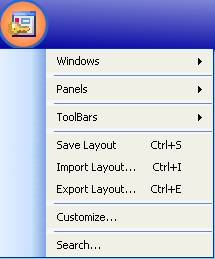
There is a system dropdown button on the upper-left corner. The dropdown list items are shown as follow.
§     Windows – It will pop up all existed forms list. The users can turn on/off any form here.
§     Panels – It will pop up all existed panels list. The users can turn on/off any panel here.
§     Toolbars – It will pop up all existed toolbars list. The users can turn on/off any toolbar here
§     Save Layout – It saves current User Interface (UI) layout.
§     Import Layout… – It will let users import a previous workspace layout setting.
§     Export Layout… – It will export the current workspace layout setting into a XML file.
§     Customize... – It will pop up a Customization sheet which users can use to customize all tool items.
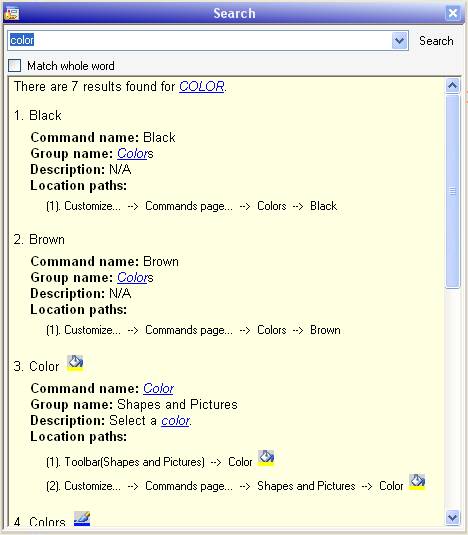
§     Search… – It will pop up the following Search panel. The Search panel will search the name, tooltip, and detail description of all commands with the given keyword, and show all the found results.
5.    Customization sheet
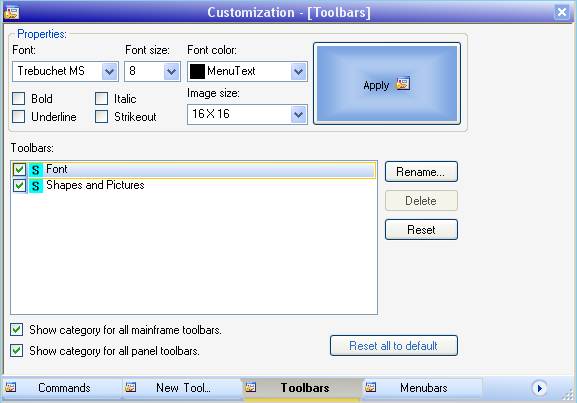
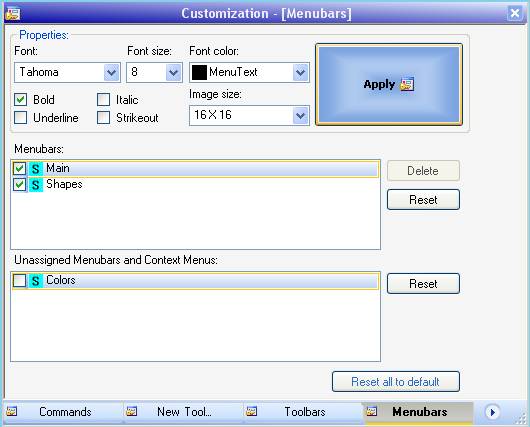
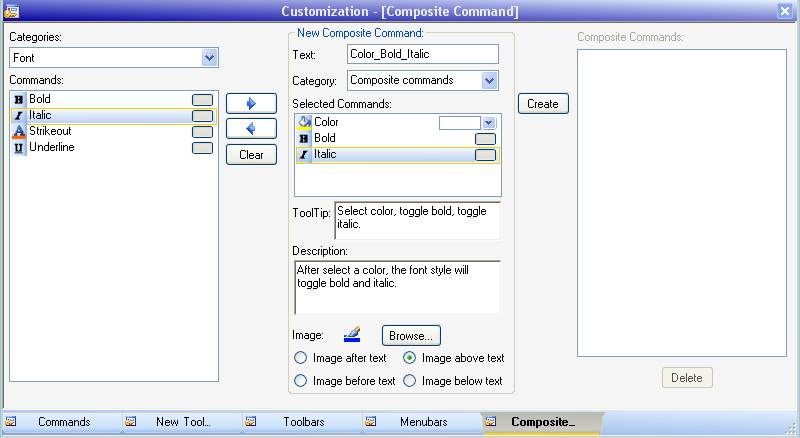
This sheet allows user to customize all menu bars and tool bars. It has five tabs, “Commands” “New Tool Container”, “Toolbars”, “Menubars”, and “Composite Command”.
·     Commands tab
The user can drag any command from this tab and drop it at any menu bar or tool bar.
·     New Tool Container tab
The user can drag out a menu bar, tool bar, or dropdown list and create it.
·     Toolbars tab
The user can use this tab to customize image and font properties for all tool bars. It can also be used to reset or rename toolbars.
§     Menubars tab
The user can use this tab to customize image and font properties for all menu bars and context menus. It can also be used to reset or rename menubars.
§     Composite Command tab
This tab allow user to combine several commands into a single command. The first component command can be any kind of item, but the remaining component commands must be either menu items or buttons.
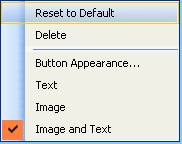
6.    Customization context menu
When it is in customization mode, right mouse button down at any tool item will pop up this Customization context menu.  
·     Reset to Default
Reset the properties of selected tool item to default.
·     Delete
Remove the selected tool item from the toolbar or menubar.
·     Button Appearance…
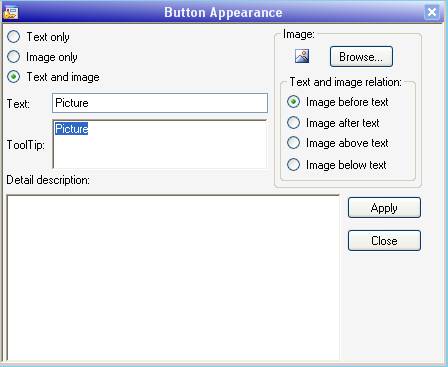
It pops up the following panel. Users can use it to change the displayed icon, command name, tooltip, detail description, display style, text and image relationship.
·     Text
The selected tool item will only display the text.
·     Image
The selected tool item will only display the image.
·     Image and Text
The selected tool item will display both text and image.

Introduction to LinsUI Layout Manager 2.1

 
LinsUI Layout Manager is an User Interface Layout manager for Windows Forms application. It supports both multiple document interface (MDI) and tabbed document interface (TDI), and both can be mixed-used.
The Tabbed Form Group (TFG) feature is useful for minimizing screen space usage while allowing an application to expose a large amount of data. Both individual form and TFG can be dragged to any place or docked to top, bottom, left, right, or center of MDI client. One individual form can be dragged onto another individual form to create a new TFG. Individual tab can be dragged between TFGs. The Minimize feature hides an individual form or TFG under the status bar. The Maximize feature zooms out an individual form or TFG to the whole MDI client area. The Group feature of TFG enables users to do page comparison among tabbed groups easily.
The Tabbed Panel Group (TPG) feature is useful for minimizing screen space usage while allowing an application to expose a large amount of data. Both individual panel and TPG can be dragged to any place or docked to top, bottom, left, or right of application frame. One individual panel can be dragged onto another individual panel to create a new TPG. Individual tab can be dragged between TPGs. The Pin button auto-hides an individual panel or TPG to top, bottom, left, or right frame of the application while the panel or the TPG is still open.
Tool items are customizable and editable. Tool item can be dragged between toolbars or menus. The Toolbars / Menubars Customization page enable user change toolbar and menu appearance, such as font size, face, color, style, and icon size. The New Tool Container Customization page allows user to create a new menu or a new toolbar for any panel or main frame. The Composite Command Customization page let user choose multi commands in any order to create a new command, which is Composite Command (CC). CC gives user the ability to execute multi-command by only one click. The Help button of a command tooltip links command to its documentation.  The Search panel helps user to use keyword to locate the functionality inside the application.
LinsUI Layout Manager enhances the appearance of UI with gradient background and elegant layout. Different user can export his favorite UI layout and settings as a XML file. When need it, can be imported back any time. All panels, toolbars, or menus can be edited under design mode easily.
It is easy to use LinsUI Layout Manager; barely requires code change to embed it into an existing project.

Sample Application picture


Sample Application demo 1

Sample Application demo 2


Download Free Trial,